


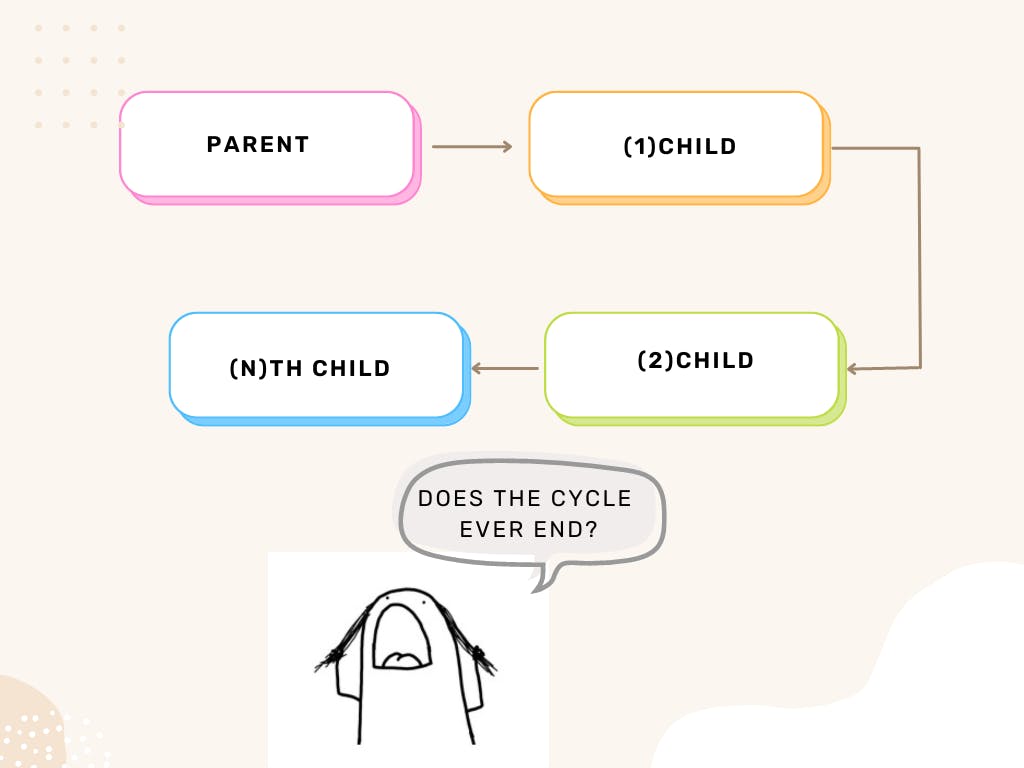
State management is the backbone of any React application. It facilitates the sharing of data across components. Once data changes, the new state is communicated across the application. The bigger an application becomes, the more its layers and the more complex state management becomes. Trust me, you don't want to cry when cutting your onions and through the layers of your application. Why drill your props to n'th child when you can access all your states from a central store? Let's first go through the heavy lifting required in prop drilling and then make our work easier using Redux.
Prop Drilling
Prop drilling refers to passing data from a parent component through multiple nested components before it reaches the intended child. In this case, the end (getting data to a target component) does not justify the means. With drilling, data is passed through a series of components that do not need it. This results in a lot of redundant code that limits component reusability and your app's performance... did someone say spaghetti?
Worry not, let's Redux this process.
Redux to the Rescue!!
Prerequisites
Before we get to the fun part, you'll need:
A react development environment.
Familiarity with React Hooks.
A basic understanding of Javascript and JSX.
Have the latest versions of Node.js and npm installed on your machine.
Run the following command to install all Redux packages required to complete this project.
npm i --save redux react-redux @reduxjs/toolkit
What is Redux?
Redux is a central store for application data that acts as a single source of truth. All components have access to the store, thus significantly reducing the need to drill props through components. For Redux to provide this unidirectional data binding flow, it operated on three core components: A store that holds the application state, actions that facilitate user interaction with a system, and reducers that handle data changes and update state. Okay, I know that can be a mouth full for a start... it gets easier when you figure out how these components work together. For better understanding, we shall use a simple login component that updates user details on a profile component.
Configuring the Store
A store is a Javascript object that contains the Application's state. All reducers are passed through the store before the required actions are dispatched. To create a store, navigate to the original
index.jsfile, import aProviderfromreact-reduxandconfigureStorefromreduxjs/toolkit. In our case, we are using theconfigureStorefunction since it allows us to pass predefined reducers. We also get to have cleaner and more readable code. Pass thecreateStorefunction which returns astoreobject. This function holds all reducers which are in turn made available to the whole application using the react-reduxProvidercomponent.
import React from 'react';
import ReactDOM from 'react-dom/client';
import App from './App';
import reportWebVitals from './reportWebVitals';
import {configureStore} from '@reduxjs/toolkit'
import {Provider} from 'react-redux'

const store = createStore()

const root = ReactDOM.createRoot(document.getElementById('root'));
root.render(
  <React.StrictMode>
    <Provider store={store}>
      <App />
    </Provider>
  </React.StrictMode>
);
Now that the <App/> component is wrapped in the Provider, all components can connect to the store and access stored states, update states, and register or unregister any events.
Actions
Redux actions are javascript objects that handle events. They are the medium through which data moves from a component to the store. Examples of actions are such as when a user triggers an API call or submits a form. Actions are created using a type property and a payload object. The type dictates the kind of action taken while the payload object holds information that a reducer uses to update a state.
  {
  type: "Login",
  payload: {
      username: "All Names",
      password: "userPassword"
      }
  }
For instance, if a user were to login into our application, they would take a login action. This action would require a username and a password as its payload.
Creating an action is facilitated by an action creator which allows events to be executed using the store's
store.dispatch()method. It takes the initial values of the payload as arguments. Our action creator will look like this.const userLoginStatus = (username, password) => { return { type: "Login", payload: { username, password } } }Reducers
Redux reducers are javascript callback functions that act as event listeners. They receive the current state, listen for actions, and then return a new state when necessary.
(prevState, action) => newState.What makes reducers convenient is that they do not handle asynchronous logic. They are only meant to make immutable updates to states. If a user triggers an action but no changes are needed, the state remains as-is. Reducers are created using thecreateReducermethod. However, we shall use thecreateSlicefunction fromRedux-toolkit. This function significantly reduces the boilerplate code required when creating both actions and reducers. It takes an initial state, a function containing all reducers, and a slice name. It then autogenerates action creators corresponding to action types. For instance, we shall have an authSlice that contains login and logout reducers.First, let us create a new
featuresfolder in oursrcfolder. Add anauth.jsfile. This file will hold our reducers and actions.import {createSlice} from '@reduxjs/toolkit'; const initialStateValue = {firstName: "", lastName: "", email: "", age:0} export const authSlice = createSlice({ name:"auth", initialState: {value: initialStateValue}, reducers: { login: (state, action)=>{ state.value = action.payload }, logout: (state) => { state.value = initialStateValue } }, }); export const {login, logout} = authSlice.actions export default authSlice.reducer;
Allow me to introduce you to the
createSlicefunction magic... step by step.
We import the
createSlicemethod from the redux-toolkit library.We create a variable that holds the initial login state.
We create a slice using the createSlice method.
We give our slice a name. In our case "auth" since it holds the login and logout reducers.
We pass the initial state variable we had created in step 2.
We define our reducers. The login reducer takes the initial default value, listen to changes in the initial value through the
action.payloadand then updates the state if necessary. The logout reducer, on the other hand, will listen to the logout action and reset the value to the initial state.Actions corresponding to the reducers are autogenerated.
We export the authSlice for access to other components of the application.
How easy was that?
Now, let's connect the reducers to the store. Import the authReducer from your features folder. Pass it as a reducer in the store object as shown below.
import React from 'react';
import ReactDOM from 'react-dom/client';
import App from './App';
import reportWebVitals from './reportWebVitals';
import {configureStore} from '@reduxjs/toolkit'
import {Provider} from 'react-redux'
import authReducer from './features/auth'


const store = configureStore(
  {
    reducer: {
      auth: authReducer,
    },
  }
)

const root = ReactDOM.createRoot(document.getElementById('root'));
root.render(
  <React.StrictMode>
    <Provider store={store}>
      <App />
    </Provider>
  </React.StrictMode>
);


reportWebVitals();
All set! Let's make this data available to the components that need it. In the src folder, create login.jsx and profile.jsx files. Once the user logs in, their information will be displayed on their profile page. Our login page will have a simple login and logout button.
import React from 'react'

const Login = () => {

  return (
    <div>
        <button onClick={() => {}))
        }}>Login</button>

        <button onClick={() => {}}>Logout</button>
    </div>
  )
}

export default Login
Our profile page will display the values of keys identified in the initialStateValue variable in the auth slice.
import React from 'react'

const Profile = () => {

  return (
    <div style={{color:theme}}>
        <h1>Profile Page</h1>
        <p>First Name: {}</p>
        <p>Second Name: {}</p>
        <p>Age: {}</p>
        <p>Email: {}</p>
    </div>
  )
}

export default Profile
Now that we have our components, how do they gain access to the store? Redux has useSelector() and useDispatch() hooks that allow for state and dispatch mapping to props respectively. The useSelector() will make a comparison between the previous and current values when actions are dispatched and rerender the UI if there is a change in values. useDispatch() on the other hand dispatches an action based on user interaction with an application. For the login page, import useDispatch from react-redux and the login and logout actions from the auth slice.
import React from 'react'
import { useDispatch } from 'react-redux'
import {login, logout} from '../features/auth'

const Login = () => {
  const dispatch = useDispatch()

  return (
    <div>
        <button onClick={() => {
          dispatch(login({firstName: 'John', lastName:'Doe', age: 20, email: 'johndoe@doe.com'}))
        }}>Login</button>

        <button onClick={() => {
          dispatch(logout())
        }}>Logout</button>
    </div>
  )
}

export default Login
For the profile page, call the useSelector method to update the new state.
import React from 'react'
import {useSelector} from 'react-redux'

const Profile = () => {
  const user = useSelector((state) => state.auth.value)

  return (
    <div>
        <h1>Profile Page</h1>
        <p>First Name: {user.firstName}</p>
        <p>Second Name: {user.lastName}</p>
        <p>Age: {user.age}</p>
        <p>Email: {user.email}</p>
    </div>
  )
}

export default Profile
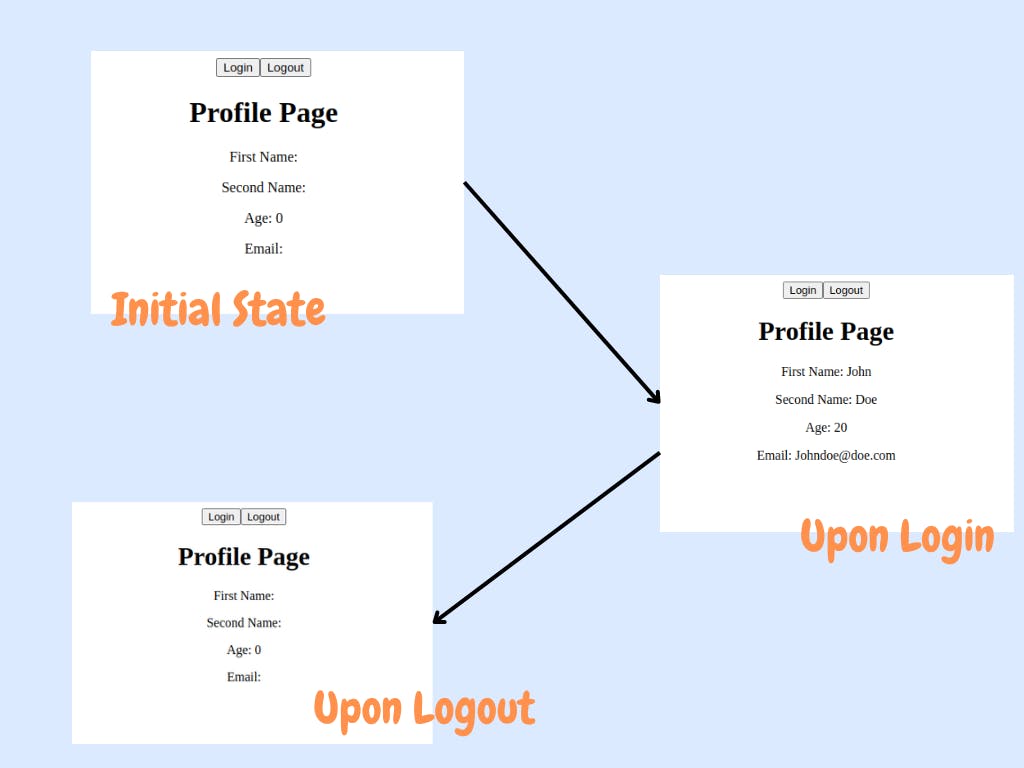
In your app.js file, import your login and profile components to view UI. Once you click the login and logout buttons, you can see the state update.
import './App.css';
import Login from './components/Login';
import Profile from './components/Profile';

function App() {
  return (
    <div className="App">
      <Login/>
      <Profile/>
    </div>
  );
}

export default App;
We just Reduxed that process!!!
Conclusion
Redux is a powerful tool in state management since it serves as a central source of truth. It becomes easier to trace actions based on the changes seen especially when a system grows in size. States also become predictable since actions are inherently tied to their reducers. Consequently, code is easily maintainable. On what are you waiting, try some Redux today...