

As discussed in the first part of this series, e2e tests mimic end-user behavior. If a user were to login into a platform, there are at least three behaviors you could expect.
Try login using invalid credentials.
Try login while some inputs fields are left blank.
Try login using valid credentials.
These three scenarios need to be captured in the e2e tests and their outputs predicted and captured. This is where webdriverIO selectors come in handy. Selectors allow a tester to identify, query an element, and apply an action to it. In this tutorial, you will get to identify different types of selectors and methods that accompany actions. A selector is identified using the $ and $$ commands. The $ command fetches a single element from your DOM while $$ fetches multiple elements that return a chainable promise array. For this tutorial, we shall use the https://www.w3schools.com/ to test the login page.
Prerequisite
- Go through the first article of this series.
Identifying a Selector
A selector determines the accessibility of an element. For instance, a button could have a unique id or class that could serve as its selector. Let us look at a sample button:
<button
  id="main"
  class="btn btn-large"
  name="submission"
  role="button"
  data-testid="submit"
>
  Submit
</button>
There are different ways to target this button. However, some ways are better than others. The id, class, and role are too generic. For instance, the class assigned here is held by all bootstrap large buttons. However, the submit data-tested and how the user will use the button sets it apart from other elements. Once you inspect an element on your console, ensure that the attribute you pick out is unique and unlikely to change upon code refactoring.
Test Syntax
WebdriverIO test syntax heavily relies on javascript's promises and asyn/await for error handling. When writing your test, WDIO first requires a description of what a test suite will do. For example, a login description could be "test all scenarios for a login page". The describe callback function then takes an "it" callback that runs the test cases. For instance, one test case could be a user logging in using valid credentials. Let's get our hands a little dirty. Navigate to your test/specs folder. Here create a new login.js file and paste this code.
describe('My Login application', () => {

    it('should throw an error message for invalid login credentials', async () => {
        //test case code goes here
    })

    it('should highlight input section left blank with red and throw an error message', async () => {
        //test case code goes here
    })

    it('should login with valid credentials', async () => {
        //test case code goes here.
    })


})
Both the "describe" and "it" code blocks take a string and a function as their arguments. How do we automate our test cases?
Automating Test Cases
Automating test cases requires a tester to identify elements and handle them as an end user would. For instance, if you wanted to log into your https://www.w3schools.com/ account, you would first browse the login page, go to the email and password input sections, fill in your details, and then click the login button. This is the same sequence used within the "it" code blocks.
describe('My Login application', () => {

    before(async() => {
        await browser.maximizeWindow()

    })

    //Test invalid credentials

    it('should throw an error message for invalid login credentials', async () => {

        await browser.url("https://profile.w3schools.com/log-in?redirect_url=https%3A%2F%2Fmy-learning.w3schools.com")

        await $('input[name=email]').setValue('*****@gmail.com');
        await $('input[name=password]').addValue('*****');
        await $('[type="submit"]').click();

        await browser.pause(3000)
    })

    //test blank input fields

    it('should highlight input section left blank with red and throw an error message', async () => {

        await browser.url("https://profile.w3schools.com/log-in?redirect_url=https%3A%2F%2Fmy-learning.w3schools.com")

        await $('input[name=email]').addValue('');
        await $('input[name=password]').addValue('*****');
        await $('[type="submit"]').click();

        const span = await $('span')
        console.log(await span.getText())

        await browser.pause(3000)

    })

    //Test valid credentials

    it('should login with valid credentials', async () => {
        await browser.url("https://profile.w3schools.com/log-in?redirect_url=https%3A%2F%2Fmy-learning.w3schools.com")

        await $('input[name=email]').addValue('*****@gmail.com');
        await $('input[name=password]').addValue('****');
        await $('[type="submit"]').click();

        await browser.pause(5000)

    })


})
Let us go through this code block.
Call the browser and target a specific URL. In our case https://profile.w3schools.com/log-in?redirect_url=https%3A%2F%2Fmy-learning.w3schools.com. This line triggers WDIO to open this URL on the Chrome browser.
Use specific selectors to target input elements. Since there are multiple input fields, their names become their unique identifiers, thus the
$('input[name=email]')and$('input[name=password]')syntax.Apply the
addValuemethod. This method directs WDIO to add a specific value to the identified element. Depending on the nature of the test case, adjust the value.Target the button using its submit function and then click on it.
Trigger the browser to pause for 5 seconds to catch any popups or to navigate to other pages.
Run your test script
Use the command below in your project's terminal to run your test
npx wdio run ./wdio.conf.js --spec test/specs/login.js
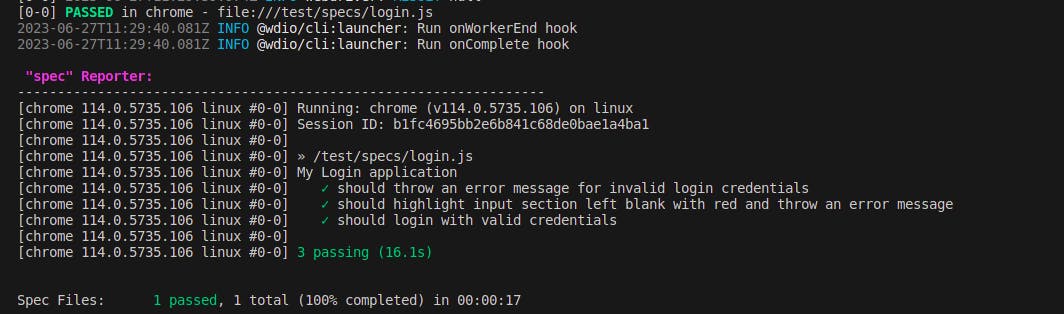
WebdriverIO should run and give a success report.
Wrap Up
E2E testing got easier? I believe so. Go forth and automate your tests!! In the next part of this series, we shall look at how to incorporate webdriverIO into component-based frameworks such as React.js, Vue.js, Svelte, and SolidJS among others...
Stay tuned.